Sunday, 25 October 2020

Aft Keel Bolt Reinforcement


As I worked through sanding and painting the bilges and grinding the limber holes, I decided to give some attention to the aft keelbolt area, which had washers bearing on fibreglass with no extra reinforcement.  No real reason other than I had the area disassembled, had the required materials on hand, was in the process of painting, and it is intuitively a good idea.   

The area in question

A carbon fibre and glass pad was made first, dead flat.   This to be bedded into a dense epoxy/long-strand-glass/cabosil putty, with additional laminations of epoxy/biaxial stitch mat installed in situ.  Photo taken while determining the location of the hole to be bored for the bolt.  
The patient prepped.
The flat carbon/glass pad installed on top of the putty, still  uncured, with the next laminations laid up on a sheet of waxed paper, awaiting installation, wet on wet for the best comformability and bond.    The latter is made of several layers biaxial stitch-mat, each progressively smaller.  This makes a lamination that tapers toward each edge.  This makes sense structurally and finishes nicely.  The thinking is explained further in another blog post.
The lamination inverted and carefully placed, edges smoothed, and waxed paper on top to assist in forming a smooth finish.

And to finish.


While we're at it might as well make a new plate/washer.  Self-explanatory.


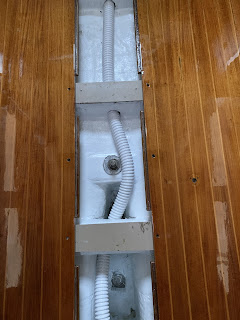
And the final result, epoxied and varnished cabin sole, new bilge pump hose, bolts re-bedded and torqued to spec.


Wednesday, 14 October 2020

Battle of the bilge - Oct 2020

It must be getting toward time for a new boat as I am now addressing things that are minor annoyances.  

In this case its a few minor water traps that are harmless but harbour mildew if the boat is left for any length of time.  (sailing keeps this water moving and draining.)   Most production boats suffer from this to some extent, and can be improved with correctly located and finished "limber holes" that permit the water to drain and find its way down to the bilge sump, and with greater ventilation through all enclosed lockers and spaces.  I believe that the 33-2 would benefit from a grate replacing the centre panel of the cabin sole, and from lift-out sole boards in the rest.   This is quite doable, and I may just....

In Windstar’s case these limber holes were drilled in a variety of locations, but being round, and sometimes blocked somewhat with resin, they did not always allow the water to fully drain.  Improvement requires turning the round hole into a mousehole, and grinding away any resin blobs or build up that block the flow of water.  Fussy time consuming work that is understandably not first priority in a production setting.      

Below are photos of the bilge with teh cabin sole removed.   Note that in the photo below you can see a raised area in the hull indicating a small cored area or structural shape.   The 33-2 is widely described as having no cored areas below the waterline, however there may be a small area here, in the flat section forward of the keel.  Yes, the 33-2 has a flat bottom, forward of the keel.


The main cabin, below the sole (floorboards) where you can clearly see the beige liner and the lighter coloured hull and "spider" structural grid.   This grid is undamaged and remains as new.  
The liner in this area is not structural though it is bonded with putty to the top of the grid, to form a flat landing for the cabin sole.  The sole is screwed to the liner.  
The liner is bonded to the hull with both putty and fiberglass at the inner bottom inside edge of the settees and at the bottom of the space behind the seat backs.   The glass work is solid, smooth and well done and very sound.  This excellent bond most certainly incorporates the liner into the hull's structure.   

This most excellent bond below the settee does have one disadvantage, and that is that it does not permit water to drain.   (as when you allow the tank to overflow with the inspection port open, or when a tank fitting fails.)


In the two preceding photos you can see the "high tide" marks left by the standing water.   

While the boat was apart I pressure tested the water tank to 10psi.   No leaks.

Below after grinding the limber holes, cleaning, sanding and rough spots and glass edges, and painting.
Note that the bilge pump hose is being replaced as well.  (the original factory hose was intact but I felt it was prudent to renew, given its age)


....And since I was doing that, 8 coats of varnish on the cabin sole, and two thick coats of epoxy on the underside and end grain.   


.....and since I was doing that, I decided to reinforce the area where the aft keelbolt bears.   https://cncwindstar.blogspot.com/2020/10/aft-keel-bolt-reinforcement.html

...And since I was doing that, I figured I'd re-bed each keel bolt, add some reinforcing plates, and clean and polish the hardware.


Looking forward to messing it up next season!


Tuesday, 22 September 2020

#3- Chargers, controllers and monitoring.

Windstar will be reconfigured with 175w rated solar generation and a lithium or AGM house bank with 150ah or greater usable capacity.  This requires a relatively compact, low power charging setup that can manage 3 charging sources, and can charge both lithium and lead-acid batteries.  An inverter is not required.  This works for how Windstar will be used for the foreseeable future.

Before going further it is worth mentioning that 200w solar/200ah would provide independence of any additional charge source.  This is tempting for obvious reasons, but would also permit separate and therefore simplified house and starting systems. 

AC charging systems that (today) claim lithium compatibility seem to be designed for larger applications.  Typically for powerboats, these setups include high output alternators,  significant 120v loads, powerful inverters, automatic transfer switching to a generator, etc....     I need none of this stuff.

  Is a lithium-ready AC charger actually required?   I've been told it is not, provided the lithium battery has on board BMS.  This battery Management intelligence manages much of the charging logic, essentially the smarts of a smart charger.  Lithium cells themselves are also available, without the BMS.  This would explain why chargers cannot make the broad claim of supporting Lithium batteries.        

To recap - The system requires:

  • Shore power charging - (I have the xantrex Trucharge 20+ unit now.   It supports lead acid charging only)
  • use of the alternator   
  • An MPPT solar controller.
  • Ideally - each of those systems maintains a charge on both the house bank and the start battery, and can do so without each manually selected.  (At the dock the engine could be idling, while the shore power is connected, while the solar is generating).
As I researched, I learned that in the RV world, alternator-powered charging of the house bank (often meaning mixed battery types, sometimes including lithium) is typically accommodated through a DC:DC charger.  This device permits the use of mixed battery types by managing a selectable charge profile on its secondary (house bank) side, irrespective of what exists on the primary (starting battery/alternator) side.  This is required as the alternator voltage can exceed that which is acceptable to the lithium battery's BMS, triggering its protective circuitry.      The DC:DC charger does not replace the AC:DC charger.   It is required to manage the alternator's output only, provided the lithium bank's BMS can manage the AC:DC charger's output.   The AC:DC charger could be connected to supply the DC:DC charger as does the alternator as well.  

The latter setup can be thought of  as the starting battery, alternator, and shore power charger living on one side (the lead acid side) and and charging  the DC:DC charger, and the Solar setup and house bank living on the other, lithium-capable side, and also charging that bank.  Having two chargers in series would presumably reduce efficiency but might simplify wiring or monitoring if the DC:DC charger possess this.  (The older Xantrex does not)

So, Windstar's single, bulletproof shore power charger  will morph into a system with an additional DC:DC charger plus a solar controller, each of which need some sort of monitoring, and must be compatible with each other in use.  How can this be simplicated?

Solar and DC:DC combined


 https://www.renogy.com/dcc50s-12v-50a-dc-dc-on-board-battery-charger-with-mppt/

Enter the Renogy DCC50S, a combined MPPT solar controller and DC:DC charger.    This is one of the few integrated devices I've found that appears to suit this application.  I expect that as lithium battery prices fall there will be more.  This combines the DC:DC charger and solar controller in one box.    

One limitation of this device is that the 50a charging current referred to is the sum of 25a solar and 25a other DC sources.   Many with lithium house banks want to take advantage of lithium's rapid charge capability, and this requires more current than 25a from the other DC sources (typically a generator, or high output alternator).  Not an issue for me as the primary house bank charge source will be solar, supplemented by shore and 50a alternator as before.    

  • 175a solar setup will deliver only 9a max, well within the DCC50s' maximum, so it should run cooler.   
  • The Xantrex charger provides 20a for shore power use,  20% below the DCC50s max if I choose to connect in series.    
  • The alternator can theoretically deliver 50a, so in theory it may take longer to charge via the alternator than in the past.   The more rapid charging of AGM or lithium may offset this, as will the incremental amps of solar, but the practical impact is unclear.  Given the additional solar charging and larger house bank I don't expect to experience anything but a significant overall improvement in practice. 
  This unit has no display,  only indicator lights.  Renogy offers a bluetooth module,  accessed via an app, and has an ethernet-type port "for future development",  which could drive a display or feed data to a network.   We shall see.      Monitoring may be quirky or weak.   I need to verify whether my Victron BMV 700 is compatible with a lithium bank.  

Finally while the Renogy device does not manage a solar-powered charge profile feeding back to the start battery, it does at least maintain a float voltage should the boat be left unplugged for weeks or months.  A bonus.    The start battery will continue to be charged by the alternator and the Xantrex true charge as has been the case for decades.  I will no longer need my ACR (there is one in the DCC50s) and will need to think through how my battery switch and AC:DC charger should be configured.  

The plan is taking shape.   

I have purchased both the DCC50S, a bluetooth module, and a 175w Renogy flexible solar panel for installation on the bimini.   


Next is to commit to either an AGM or LiFePo house battery bank.  Am leaning to the latter.

To read more on this project click the label/filterwith the tag ‘solar and batteries’ on the right. 

Dave


Monday, 7 September 2020

#2 Charging and battery options - Upgrade strategy


Based on the parameters identified in the previous post150-200ah usable is a reasonable house bank capacity for Windstar's typical use, in the absence of any additional charge source.  While this leaves little safety margin, it also assumes no motoring or marina time.  Today Windstar has approximately 120ah capacity.  (best case) Supplemental solar generation would provide extended range and a needed buffer.

Which Batteries are Most Appropriate?

See below for a comparison of available battery types that meet this requirement within Windstar's existing battery footprint.  (2ea group 31)  Note:   I have not updated this table with accurate pricing for each.  


The green-shaded cells indicate that without any supplemental charging, and at full rated capacity, only the lithium and largest deep cycle batteries can exceed 150ah capacity with the DOD as specified.   This is the low end of the range identified for Windstar's use, and does not consider the gradual reduction in capacity as the batteries age.  The table does not consider the possibility of an expanded footprint or of mixing battery group sizes to "get to a number", which is a reasonable approach.  The cost and weight per available amp hour is consistent by battery type, so extrapolations are not difficult.    
The costs are only estimates (not very accurate it turns out) and include only the batteries themselves.   (i.e. purchasing an appropriate charger for lithium or up-sizing the charger, or replacing the flooded start battery with AGM to match the house bank might also be required)     I have eliminated several columns of data from the original spreadsheet, however my early conclusions are:
  • Without any supplemental charging, and at full rated capacity, only the lithium and a pair of largest deep cycle batteries (GC2H) can meet the 150ah capacity with the DOD as specified.  Lead acid/agm can only just meet the 150ah threshold without adding additional weight and possibly having to modify the boat to increase the space available.  Lithium can easily meet the objective, but at a considerable up-front cost.  
  • Group 8d lead acid batteries were ruled out due to weight.
  • Lithium batteries are as cost-effective as lead acid over their service life provided they (and I) last for their rated 10 year life.  ***  note i have since found lithium batteries at significantly lower prices than anticipated.
  • The 3-year cost is included as I may move up to a larger boat within this time frame.  
  • Flooded batteries must be installed upright, limiting options as there is less than 12" clear  beneath the quarterberth.   Fitting smaller lead-acid batteries alongside the larger ones is a possibility.  AGM batteries, which can be installed on their sides, opens a number of possibilities and is a better choice for other reasons as well.
  • While the lithium technology is very appealing, the cost of the batteries is high, a new or additional shore power charger might be required.   If I were contemplating net-zero solar in a larger 10-year boat for extended cruising, Lithium would be the clear #1 choice.   This is discussed and resolved in  a subsequent posts.
  • It is a challenge but not an impossibility to install a 200 a/h (usable) lead-acid battery bank in a boat of this size and type. 

 2ea GC2h AGM batteries provide capacity in the target range, and would not require additional space or add much incremental weight.  An additional  12v AGM battery could easily be added later if required.    AGM batteries cost more than flooded batteries, but tolerate deeper discharge, charge more rapidly, and have a longer service life
 (* update - high capacity GC2H AGM batteries are not as widely available or as competitively priced as the commonly used  GC2 batteries.   The price delta between GC2H AGM and lithium sourced through industrial suppliers is not nearly as great as estimated initially) 

Which Solar Panels are appropriate?

The table below shows some of the form factors and outputs of the flexible monocrystalline solar panels available today.   Those shaded  are the maximium output power that will fit on Windstar's bimini, the highest output of these claims 175w.  Solbian panels are extremely costly - at least 5X the price of Renogy.   
  • 3 ea 50w panels could also fit on the bimini with the advantage of having independent controllers.
  • A 50w panel could be installed on Windstar's dodger if needed.
Ideally, a single 175w solar panel would suffice.   

What are others doing?

To validate all the preceding calculations and theory, I asked the fine people on the C&C owners list about their experience with both solar generation and battery bank size.


  • A reasonable rule of thumb for my cruising area is 3 hours of rated wattage per sunny day.  This equates to 24ah/100w panel.  ** note that an article in Practical Sailor suggests that 5hrs while sailing and 7hrs while at anchor is a useful rule of thumb.  This is not consistent with the experience of C&C list members, however, the three hour per day figure may be very conservative, especially in mid-summer.
  • Increasing either solar generation wattage  or house bank capacity reduces typical depth of discharge in use, and therefore increases battery life.   
  • 200w/200ah (usable) seems to be the threshold for a self-sustaining solar system aboard sailboats of this approximate size and type, provided a MPPT controller is used.   
  • Boats that can comfortably accommodate lead acid banks and solar panels of this size are typically larger than Windstar.  Many of the installations I've seen locally use additional bracketry for the panels, and are somewhat inelegant.   I wouldn't do that to Windstar!
These examples validate most of the previous estimates and assumptions, and suggest that 175w of generation will extend Windstar's range, but may not be adequate to self-sustain.   

So, what is an appropriate strategy for Windstar?

  • Using only the available bimini top, Windstar can add a 175w Renogy flex panel or other of a similar form factor.    This would suffice to extend Windstar's "no charge" range by the two days as intended, but she would likely require charging from other sources in some hopefully rare situations.
  • Removable panels could (theoretically) be incorporated when required.
  • While less than ideal due to shading, it is physically possible to install a 50w panel on the dodger.  This should be enough for Windstar to become independent of external charging.
  • Given the 175w generation constraint above, energy storage capacity should be 150ah at a bare minimum, however more should be considered.   
  •   Lithium is therefore worth considering.
  • So, it is most practical to start with a 175 watt panel(s) on the bimini and use the existing battery footprint.  If this is unsatisfactory:
    • Any charging or control hardware should be lithium-compatible for possible future upgrades.
    • Storage capacity can easily be increased if required. 
    • 50w incremental solar capacity can be added to the dodger if required. 
    • while the alternator could be upgraded to one better able to quickly charge the house bank, there are many reasons why this is not a good approach.

What does the proposed setup offer in use?

Here's a simple estimate of how the various batter configurations and types would be impacted by 3 days at anchor with only one sunny day.


Same cruise, 3 sunny days.


Conclusions on Generation and Storage:

  • 200/200 would take Windstar off the grid.    Less storage or less generation capacity would not achieve this under all conditions, but should do so most of the time.  Very encouraging.   175/150-200  should comfortably meet the original objective of extended cruising in the Great Lakes.
  • Windstar's primary constraint is the space available to install solar panels.  Generation is limited to 175w.  (225w with the addition of a second panel.)   
  • Generation and battery capacity are a tradeoff with respect to depth of discharge and carefree cruising.
  • Therefore, adding additional battery capacity is the most appropriate path to keeping depth of discharge reasonable.
  • This makes using 2X100ah lithium batteries even appealing as it provides 180ah of storage within the existing footprint at less than half the current weight.   (54lb vs 120lb).  The GC2H option offers 156ah at over 150lb.  
The next post deals with determining how to charge and manage this.  

To read more on this project click the label/filterwith the tag ‘solar and batteries’ on the right.