My Martec was tired and I knew I wanted a folding prop to replace it. Pretty happy with the Gori. Do beware that the normal shaft section where the castle nut is installed may be different in length than a typical North American prop. (the gears foul the end of the shaft on the gori, there is more space on the martec. A long story but it took some doing to install this, and some mods to a brand new shaft.
In any case it works great, no issues so far. Shipped air from Denmark amazingly quickly, great service from the agent in New England somewhere.
Welcome. This blog is intended to share and discuss upgrades and modifications to Windstar, my 1985 C&C 33 mk ii. please use the web view and browse the posts by type or date.
Monday, 24 October 2016
Sunday, 23 October 2016
What are these used for?
Documenting my rig for winter work and a new mainsail, and it's like a box of chocolates...
Here is the gooseneck fitting from below - what are the two fairleads for? (Cunningham maybe?)
Another mystery item, this shot from the bottom of the boom. The swivel padeye is the vang attachment. What was the the cleat mounted forward of that used for?
Does anyone know who manufactured the padeye itself?
The next two show why it is a good idea to inspect the rig! End of boom casting fracture, and mainsheet attachment rivet failure.
Here is the gooseneck fitting from below - what are the two fairleads for? (Cunningham maybe?)
Another mystery item, this shot from the bottom of the boom. The swivel padeye is the vang attachment. What was the the cleat mounted forward of that used for?
Does anyone know who manufactured the padeye itself?
The next two show why it is a good idea to inspect the rig! End of boom casting fracture, and mainsheet attachment rivet failure.
Sunday, 25 September 2016
Mid 1980s C&C keel issues
See below for photos of mid-80s C&C keel deterioration. This appears to occur where winters are freezing cold and boats are stored on land. Seems as though water migrates down the keelbolt into the lead casting and freezes each winter, incrementally enlarging any voids or cavities each seasonal cycle. These photos were shot in a short stroll around one marina yard, near Toronto.
Sunday, 4 September 2016
C&C 33-2 water strainer installation error and 2GM issue
Last week Windstar developed a noisy exhaust note, not unlike an unmuffled motor cycle engine. After a minute or two, and some higher RPMs, it would settle down to its usual quiet gurgle. Obviously this was an issue with an intermittent absence of cooling water, but why? I checked underway and the water pump was turning, its hose seemed pressurized. I also checked the water strainer (as best I could underway) and clearly water was being pulled through. This left the mixing elbow and the heat exchanger to consider.
I read over the very well-written shop manual, and went back at the boat where I disconnected the short hose between the heat exchanger and the mixing elbow, connected a length of 5/8" heater hose to the mixing elbow, and blew through it just to check for resistance. The pleasant gurgle flashed me back to high school, and the ease of blowing showed that the passages were free of serious restrictions. I put the hose on the elbow exiting the heat exchanger, and started the engine. No water, checked the water pump and noticed it was now not turning. Tightened the belt and problem solved.
I had set it quite loose and it worked fine all season, only now getting glazed to the point that it slipped at low rpm or until it got warm. I had dismissed the most likely source of trouble - the pump - because I service it every year, and because I had assumed any problem would involved a completely failed impeller. Anyway, lesson learned...or probably not. But, that's not the point... I found some other stuff.
First Issue:
The 33-2 has its raw water strainer mounted in such a way that it cannot be easily checked or cleaned. See the photo below where I managed to crop out the heater hoses above, but, in order to lift and remove the strainer basket, it was necessary to remove the coolant reservoir, by sliding it upward off its bracket, but in order to that, it was necessary to unscrew the two P clamps securing the hot water hoses. (you see those in the photo below)
The solution (below) is simply to move the coolant reservoir bracket to starboard, and move the coolant hose p-brackets upward slightly. There was enough play in the hoses that this was no problem.
Second issue:
When removing the hose connecting the heat exchanger to the mixing elbow, the small elbow/fitting on the heat exchanger came off in my hand, despite what appeared to be a securing set-screw holding it in place. See below.
That screw (the Philips head, clearly visible) engages a groove in the elbow and this holds it and its sealing o ring in place, allowing a secure seal with 360 degrees of rotation. On mine, the screw was pitted and flush with the bore, and did not penetrate into its receiving groove in the fitting. Over time it had eroded or corroded, had become effectively shorter and no longer secured the elbow. In the photo above, if you grabbed that elbow and pulled hard, straight up, the elbow would lift out of its bore. When running, coolant pressure is not adequate (I think) to overcome the tension placed on the joint by the hose, however the screw obviously needs replacement. Yours probably does too.
I read over the very well-written shop manual, and went back at the boat where I disconnected the short hose between the heat exchanger and the mixing elbow, connected a length of 5/8" heater hose to the mixing elbow, and blew through it just to check for resistance. The pleasant gurgle flashed me back to high school, and the ease of blowing showed that the passages were free of serious restrictions. I put the hose on the elbow exiting the heat exchanger, and started the engine. No water, checked the water pump and noticed it was now not turning. Tightened the belt and problem solved.
I had set it quite loose and it worked fine all season, only now getting glazed to the point that it slipped at low rpm or until it got warm. I had dismissed the most likely source of trouble - the pump - because I service it every year, and because I had assumed any problem would involved a completely failed impeller. Anyway, lesson learned...or probably not. But, that's not the point... I found some other stuff.
First Issue:
The 33-2 has its raw water strainer mounted in such a way that it cannot be easily checked or cleaned. See the photo below where I managed to crop out the heater hoses above, but, in order to lift and remove the strainer basket, it was necessary to remove the coolant reservoir, by sliding it upward off its bracket, but in order to that, it was necessary to unscrew the two P clamps securing the hot water hoses. (you see those in the photo below)
Second issue:
When removing the hose connecting the heat exchanger to the mixing elbow, the small elbow/fitting on the heat exchanger came off in my hand, despite what appeared to be a securing set-screw holding it in place. See below.
That screw (the Philips head, clearly visible) engages a groove in the elbow and this holds it and its sealing o ring in place, allowing a secure seal with 360 degrees of rotation. On mine, the screw was pitted and flush with the bore, and did not penetrate into its receiving groove in the fitting. Over time it had eroded or corroded, had become effectively shorter and no longer secured the elbow. In the photo above, if you grabbed that elbow and pulled hard, straight up, the elbow would lift out of its bore. When running, coolant pressure is not adequate (I think) to overcome the tension placed on the joint by the hose, however the screw obviously needs replacement. Yours probably does too.
Friday, 26 August 2016
Repair of keel/hull joint, closing unneeded thru hulls, and rudder
Here are some modest sized examples of glass repair- closing two thru hulls, and repairing some small damage (and voids) at the keel/hull joint.
Monday, 15 August 2016
Quest for Jacklines
Jacklines.
Added after original post: I have measured more carefully and I believe the ideal length for a 33-2 webbing jackline is just over 21 feet. This allows it to be attached to the toe-rail forward, beside the aft end of the anchor locker hatch, and aft, directly beside the genoa sheet turning block. the jackline then leads straight fore and aft and allows free passage outboard of the shrouds.
After my first real singlehanded journey on Windstar, it became clear that well thought out and consistently used jacklines are a necessity. Windstar came with ONE (?) 30' Westmarine jackline, and I sometimes rigged a length of line as #2. Kinda did it differently each time, and not every time I that should have. In any case, I have finally, firmly, grasped the obvious, and have invested some time in learning and planning a strategy.
There are many online expert opinions on jacklines, and some sources of supply for premade jacklines (few in Canada) but they are available. Here are my learnings:
- The breaking strength of jacklines for offshore use should exceed 4500lbs. (this is a minimum specified for offshore racing I believe - you can look up the reference, I forget)
- Flat is better than round as it won't roll underfoot. There is some debate about whether a flat line should be twisted somewhat to make it easier to pick up.
- The appropriate amount of stretch is a subject of some debate, however most don't stretch.
- Jacklines should be as close to the centreline of the yacht as possible.
- Jacklines should permit continuous travel the length of the yacht but should stop one tether length short of the bow and stern.
- Jacklines should be setup as taut as is practical.
- You should be able to clip onto the jackline before leaving the cockpit, and unclip after returning.
- And finally, my own addition - the jackline should not be attached to a cleat that might otherwise be needed.
Plan C would be to buy another one like what I already had. My Westmarine jackline uses approximately 6000lb breaking strength polyester webbing. The stitching is not adequate to maintain this rating. It costs $80 US for one. It is the wrong length. (and it is now for sale)
Before doing that, I thought I'd try finding the right material and fabricating the correct length. To cut to the chase, after a lot of searching and head scratching, I found the industrial equivalent in the field of cargo control, where a webbing strap with sewn end loops is known as a sling. Same stuff, but real ratings, as industry would require. I was lucky to find CTS here in Toronto, where my inquiry was quite routine, and the service was excellent, as was the product knowledge.
http://www.ctscargotiedown.com/POLYESTER-SLING-WEBBING.html
I discussed the application and we elected to use 9600lb sling webbing, and they made me up - in Canada - 4 very robust jacklines while I waited for around $12 US each! (Wouldn't it be great if every business hustled and provided value like that....) Apparently the tow truck market is different than the yacht market! Sadly though, my jacklines do not come in a cute little bag. :-(
FYI -
If I were to order these by phone or internet, I would do a sketch of the required sling, and specify the webbing part number and loop length. That would be enough.
Comparison
Rating.
Here's the application.
Overall I'm pleased with the outcome except that:
- 2' more length would have been beneficial. My initial intent had been to lash in place, and have the line lead straight and under tension before it occurred to me to use a rope grommet, doubled through the toerail, (and leave the line a bit slack) I had allowed 12" for lashing, and wanted the line a bit taut, and straight. Splitting hairs. I think rope grommets are a really sound, inexpensive, and time-honoured solution for fastening to the toerail. The one In the photo was made for another purpose and is only 4" in diameter, so I will make a few larger ones. Easy. the example below is half inch nylon that has been doubled, but it could also have been ring hitched. (cow hitched, luggage tagged, etc...)
- The spinlock carabiner (which I find fiddly) is a tight fit at first over the webbing, and must be eased to slide over over the doubled part. Other carabiners, no problem. I think the webbing will soften a bit with use, and in any case this is a small complaint. The 9800lb webbing is overkill for sure, and the 6000lb is handier in some carabiners.
So, overall, a pretty good solution, and confidence inspiring.
Wednesday, 10 August 2016
Lexan Shelves under sink
Should be clear in the photo. Storing the various containers you see here was a nuisance, and the space was wasted.
Simple solution that works.
Mahogany knife block.
I enjoy cooking (even on a boat) and dislike cheap, dull knives. Below was made from some mahogany door jamb material I had on the lumber rack, fitted to some Henkel commercial knives I found - was told these are the choice of most working restaurants/chefs. They are quite fine for the boat, and the rack is, I think, a decent solution. It was placed near the finger-hole to leave space on the left for future considerations.
Labels:
Belowdeck,
comfort and livability,
galley,
Organization
Saturday, 30 July 2016
Cool wiring trick
This seems so obvious, yet to me it clearly wasn't...
Working in a crowded panel I had connected three +12vdc wires to a breaker, mounted directly Adjacent to a breaker which was fusing the ground of the ACR.
Three ring terminals were stacked, with each wire radiating from the screw around 25 deg apart. This took up a lot of space and the hot wire's terminal was crowding its neighbour. Probably fine but I didn't like it. It then dawned on me to reverse one of the wires so the terminals were back to back, then heatshrink them together (They were coming from the same harness.) and attach to the terminal. Much tidier. Not sure why that hadn't occurred to me before...
Working in a crowded panel I had connected three +12vdc wires to a breaker, mounted directly Adjacent to a breaker which was fusing the ground of the ACR.
Three ring terminals were stacked, with each wire radiating from the screw around 25 deg apart. This took up a lot of space and the hot wire's terminal was crowding its neighbour. Probably fine but I didn't like it. It then dawned on me to reverse one of the wires so the terminals were back to back, then heatshrink them together (They were coming from the same harness.) and attach to the terminal. Much tidier. Not sure why that hadn't occurred to me before...
My preferred method of termination - good quality uninsulated closed barrel terminals, first crimped, then soldered, with clear heat shrink over top.
Sunday, 3 January 2016
First aid kit mounting bracket in acrylic
Winter 2015.
This is an industrial-type first aid kit in a nanuk case, purchased through Vallen. It will be mounted overhead at the foot of the quarter berth, (overfoot?) on the inside of the bulkhead that forms the back of the engine instrumentation/control wiring chamber. (so the case will be upright, resting on the mahogany chock, secured by the velcro and the strap)
Two layers 1/4" acrylic, fused with methylene chrolride, industrial velcro and a captive webbing strap to secure. Scrap mahogany chock, fitted to case.
Took more time to simplicate the concept than than to make. Out of the way, but easy to retrieve.
This is an industrial-type first aid kit in a nanuk case, purchased through Vallen. It will be mounted overhead at the foot of the quarter berth, (overfoot?) on the inside of the bulkhead that forms the back of the engine instrumentation/control wiring chamber. (so the case will be upright, resting on the mahogany chock, secured by the velcro and the strap)
Two layers 1/4" acrylic, fused with methylene chrolride, industrial velcro and a captive webbing strap to secure. Scrap mahogany chock, fitted to case.
Took more time to simplicate the concept than than to make. Out of the way, but easy to retrieve.
Sunday, 13 December 2015
Finishing the job - installing flat support for keelbolts and mast step.
Amazingly the weather cooperated and this job is done!
Here's how the parts created in the previous post were installed. They were bedded in very thick, glass-loaded epoxy, making a massive (relatively) dead-flat deck for the mast step and foundation to take the compression loads from the keel bolts.
And this chapter will close with a "before" image!
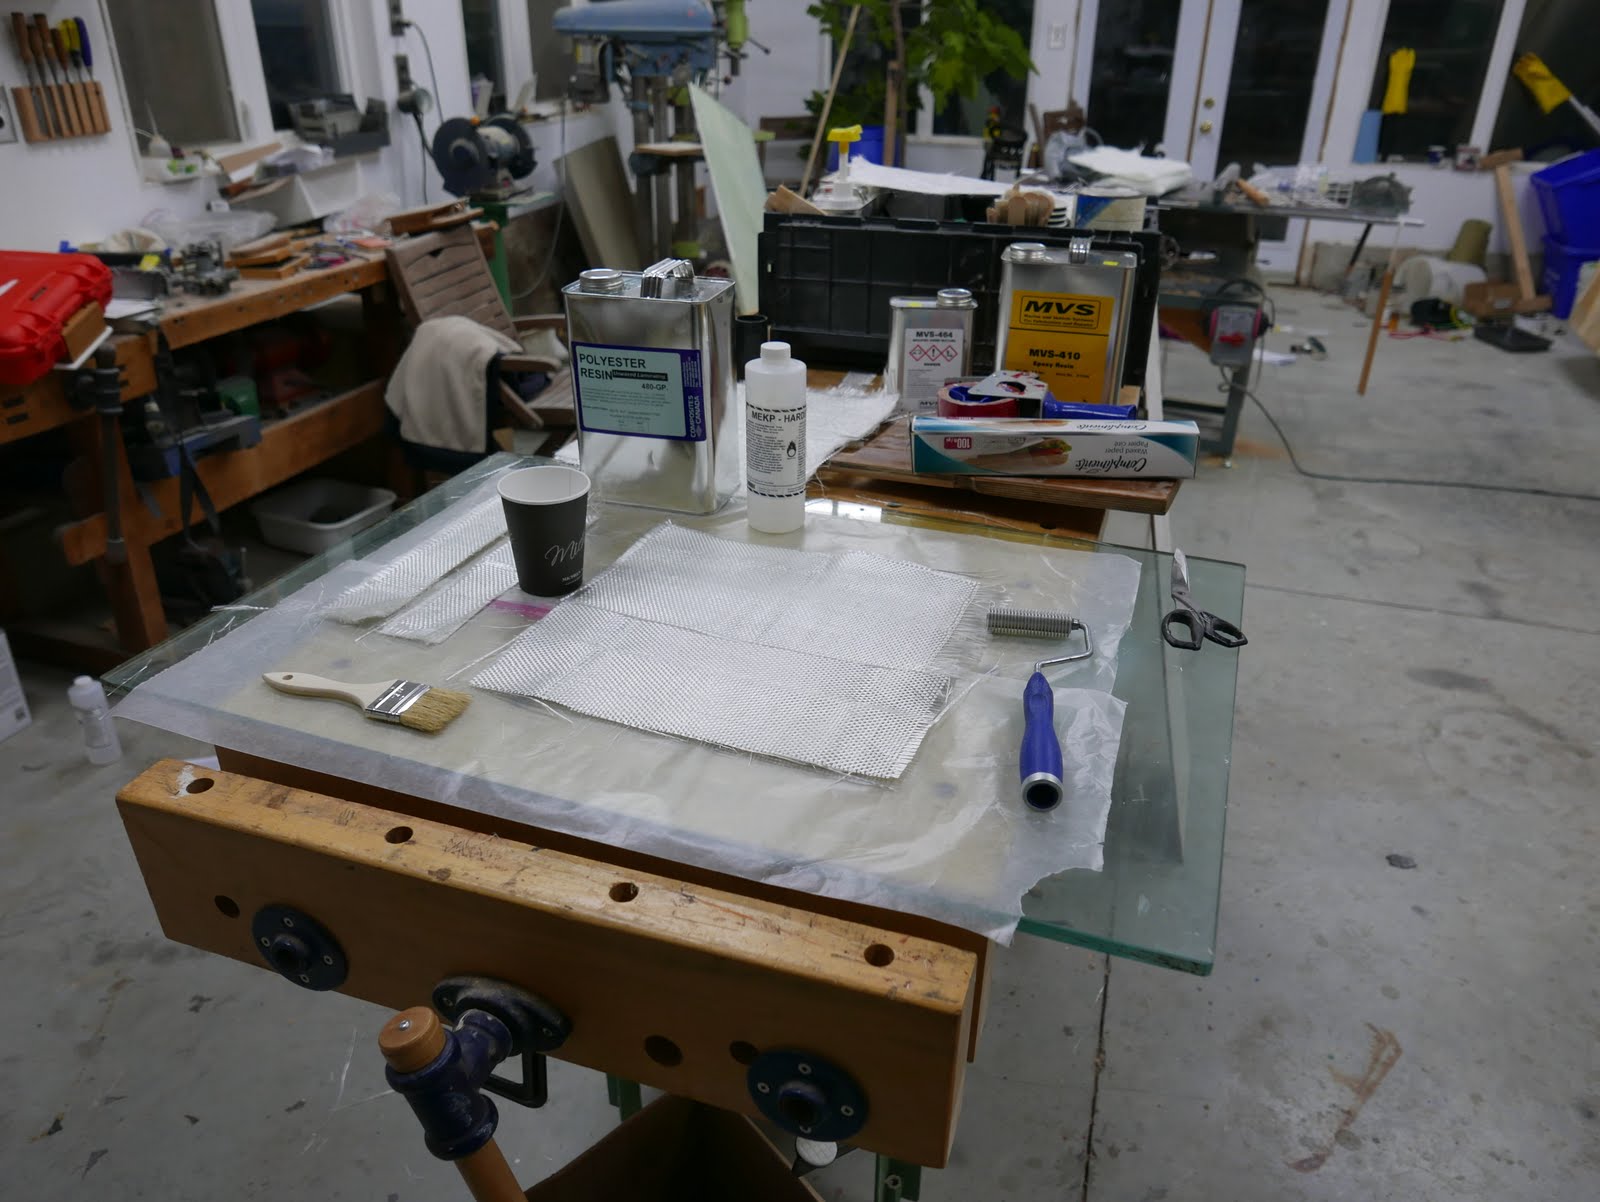
Making Fibreglass parts
Needed to make some stiffeners for both the keel bolt landings and the updated instrument transducer.
Tools are pictured, key are the grooved roller, called I believe a "consolidator", as well as a big sheet of thick plate glass, which in this case, I covered with waxed paper to make cleanup easier.
I avoid laying up in situ wherever possible as it is much easier to get a dense layp on the bench.
Read up on how to do this, but the key things are to alternate mat and cloth and to use the roller to compress the laminate and maximize the glass content. You will see the resin float up to the surface. Let it cure on the waxed paper and the sheet will be dead flat.
This makes for a very stiff, strong sheet. In this case I used 6 (I think...) alternating layers each, mat and cloth, and the result was about 3/16" thick. I think it was 6 oz mat and 9 oz cloth. I cut the parts out with a fein multimaster, and used an angle grinder to finish the radiused corners.
If you are laminating onto curved sections of boat, or for whatever reason, need or want to do the layup on the boat, you can use this technique but lift the waxed paper up and apply the wet laminate like a band-aid, using the consolidator to help it conform to the existing structure.
Tapered parts can be made by planning the work, and using progressively larger pieces of glass. (or whatever)
ultra-thin flanges for a repair job.
The deck for the mast step. Around 3/16" thick.
Two thicknesses epoxied together to be used for the second keelbolt. This is about 3/8" thick, very flat and very dense.
Hull reinforcement for transducer. Wood works, but why bother...
Subscribe to:
Posts (Atom)